Optimizely recently released CMS 12 based on ASP.NET Core (now .NET 5). With it comes a slew of new changes, including how to set up a new project. To help developers get started with Optimizely CMS on the new framework, Optimizely released a guide to creating a starter project. After working through it myself and talking with a few developers I decided to write a more detailed guide with a few additional notes to better help you get going. I updated this in May 2022 with some changes based on the updated Optimizely documentation (yay!).
This is meant to expand on what Optimizely documented.
You can refer to the Optimizely "Creating a Content Cloud starter project" guide here. I want to use my experience to enhance their guide, and add more context and clarity to what they wrote. However, Optimizely might update their documentation sometime after posting this (and they did!). I also hate jumping all around other blogs when in the middle of reading one. Because of this I am going to combine their guides into a single one and keep it a one-stop shop here. I am also adding more detail and explanation to what is going on while providing more direction and clarity for some things I feel were missed.
Additionally, now, as of May 13, 2022, this has the latest updates from Optimizely's new documentation. I commented old notes where appropriate, for reference, and rewrote parts of this guide that were different enough to warrant it.
This article is a bit longer, but it's designed to take you from start to finish, to be able to start working in a fresh CMS 12 project.
The CLI is your mode of transportation
With .NET Core - now .NET 5 and referred to as such going forward - the "dotnet" CLI command was introduced. This command provides options to create, restore, compile, publish, and run .NET 5 applications. You can read up on the official documentation here. For the Optimizely CMS setup, the "dotnet" command is used.
To proceed forward with the CLI you need to install the Episerver Templates package. Previously you also needed to use Optimizely's tool "dotnet-episerver", but that is now optional with the latest updates. You can install the Episerver CLI tool for database commands if you still want to.
The first steps below will install the templates and a starter project for you. All of the CLI commands in this process can be run from a PowerShell window, or from the Package Manager Console in Visual Studio from Tools > Nuget Package Manager > Package Manager Console. PowerShell will show your path as you work, which might be easier for some.
Also Note: Optimizely has not rebranded these commands at the time of this article. However, with the latest update the Optimizely name is on the Template name while the "Short Name" still shows the Epi prefix. Most of the commands and options are not case sensitive, but some values provided are and are indicated as such.
One final thing: Optimizely updated the Episerver.Templates package to .NET 6 with the latest 1.2.0 release. If you use Visual Studio 2019 this is a breaking change, as Visual Studio 2019 doesn't support .NET 6. However, there is a workaround using the previous version. In addition to adding a solution in the example below, I also include the same one in my article specific to this issue here: https://beendaved.blogspot.com/2022/05/optimizely-cms-12-installation-breaking.html.
Install the Episerver Templates
[pre class="brush:bash;"]
#updated commands
#use this for Visual Srudio 2022
dotnet new -i Episerver.Templates --nuget-source https://api.nuget.org/v3/index.json
#use this for Visual Studio 2019
dotnet new -i Episerver.Templates::1.1.0 --nuget-source https://api.nuget.org/v3/index.json
#old command
dotnet new -i Episerver.Net.Templates --nuget-source https://nuget.optimizely.com/feed/packages.svc/ --force
[/pre]
- new -i installs a template to .NET 5/6 (long form: new --install).
- Episerver.Templates is the template pack to install.
- --nuget-source [path] indicates the Nuget source for the template package.
- --force forces the modification and overwriting of required files for installation if required files exist.
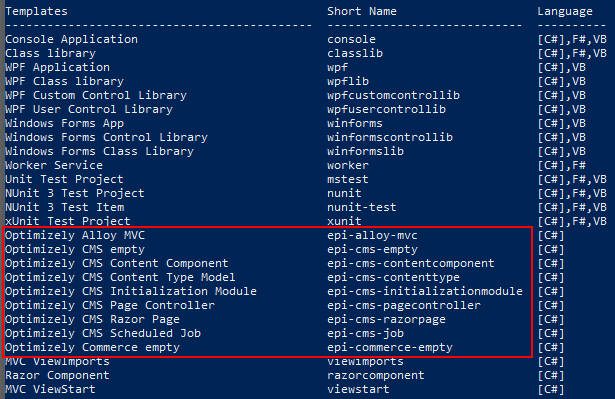
- Previously, there were only two templates installed with this package: EPiServer CMS Empty Project and EPiServer Commerce Empty Project. With the latest update, there are several more available, all sporting the new Optimizely name for the template name, but with the Epi prefix on the Short Name. The Short Name is used in the commands below, and these are highlighted in the screenshot.
Creating the new project files and folder
For this process I am going to change up what Optimizely provides in their docs. Following the Optimizely guide using PowerShell will create a new project in your current directory. If using Package Manager Console it will create one in your "Users/[YourUserName]" directory. If you run it within an empty .NET Core solution, it will create one in the root. To avoid confusion, the following commands specify the output path.
[pre class="brush:bash; "]
#new command
dotnet new epi-cms-empty -n "NewEpiCms12" -o "C:\Work\Projects\Epi Practice\New Epi Cms12"
#old command
dotnet new epicmsempty -n "NewEpiCms12" -o "C:\Work\Projects\Epi Practice\New Epi Cms12"
[/pre]
- new indicates a new project.
- epi-cms-empty [
epicmsempty] is the short name of the template to use that was installed in the first step. See screenshot above. - -n [name] specifies the name of the project (long form: --name [name]). This value is case sensitive.
- -o [PATH] indicates the path to create the project files in (long form: --output [path]). For this path, make sure the last folder is where you want the project files to live. If you want to create a folder for the project in a destination (ex: "New Epi Cms12" did not exist before this command), specify the name of the folder to create as the final part of your path. The path is not case sensitive, except for the final folder if you are creating a new one.
If you want to use one of the other site templates shown in the screenshot, like epi-alloy-mvc, you can use that short name in the command above. If you install the empty one first, however, you will need to delete the installed files, or force install the other template by adding "--force" to the end of the command.
The Episerver CLI tool is optional
The Episerver CLI tool is an optional tool you can install to allow creation and updating of databases. This was previously used to create a new database for a CMS installation. However, the new templates include a database so you no longer need to perform this step.
The information below shows how you install and use this tool to create a new database, though, if you needed or wanted to.
[pre class="brush:bash;"]
#install tool
dotnet tool install Episerver.Net.CLI -g --add-source https://nuget.optimizely.com/feed/packages.svc/
[/pre]
- tool install is the .NET 5 command to install .NET tools.
- Episerver.Net.CLI is the tool being installed
- -g indicates this tool is being installed globally on the machine, and will install to the default location (long form: --global).
- --add-source [path] adds the Nuget source to use for this tool installation. Even if the source is already added, specifying this parameter makes installation quicker as the install will check this source first.
To use the Episerver CLI tool use the dotnet-episerver command. The CLI tool contains options to create a new CMS or commerce DB, or update an existing DB. You can "CD" into the project directory, or specify the full path to the project file to run these commands.

The example below shows the use of the create-cms-database command to create a DB named NewEpiCms12. This is only needed for creating a fresh DB since, as mentioned, a DB is created when installing a template.
[pre class="brush:bash; "]
dotnet-episerver create-cms-database -S . -E -dn "NewEpiCms12" -du "sandbox" -dp "sandbox" "C:\Work\Projects\Epi Practice\New Epi Cms12\NewEpiCms12.csproj"
[/pre]
- create-cms-database is the Episerver CLI command to create a CMS database.
- -S [connection] specifies the server connection. A period "." specifies the local machine (long form: --server [connection]).
- -E indicates Windows authentication, or Integrated Security, for the connection to create the database. This is not the authentication for the DB connection string used by the CMS (long form: --integrated-security).
- -dn [name] specifies the name of the DB to create. If you omit this option a DB name will be generated for you (long form: --database-name [name]). This value is case sensitive.
- -du [username] specifies a username for the CMS DB connection string (long form: --database-user [username]). If the user does not yet exist, it will create one with the supplied value. If omitted, a username is generated specific to the DB. This value is case sensitive.
- -dp [password] specifies the password for the CMS DB connection string (long form: --database-password [password]). If omitted a random password is generated. This value is case sensitive.
- The final parameter is the path to the CSPROJ file. If you CD into the newly created directory this value is just the file name. The extension is required.
Once this command is run, the appsettings.json file in the project directory will reflect the new connection string for the created DB.

The Admin User
Prior to CMS 12 a common confusion, and often complaint, was around the first login and Admin user for the CMS. Many developers utilized a custom made, or community made, utility to create an initial Admin user for a site. With the initial release of CMS 12 this was made easier with a CLI tool command to create a new Admin user. The latest template updates make this even easier with an admin creation page at the very start of the new site courtesy of the AddAdminUserRegistration in Startup.cs.
[pre class="brush:csharp"]
services
.AddCmsAspNetIdentity<ApplicationUser>()
.AddCms()
.AddAdminUserRegistration()
.AddEmbeddedLocalization<Startup>();
[/pre]
I moved the old information for how to create an Admin user with the CLI tool to the end of the article.
Open the project in Visual Studio
Once opened in Visual Studio you can run the project right away. However, when it launches in your browser you get a blank screen. In past Optimizely/Episerver CMS projects you could add "/Episerver" to the URL and get directed to the login or the Dashboard. In this case, however, you need to add "/Episerver/CMS" to the URL. There is no Dashboard at /Episerver.
To make this process easier going forward, add the CMS path to your launch parameters for the project. The information below for doing this is based on Visual Studio 2019. This process has changed for Visual Studio 2022, and I will update when I can.
On the Debug tab for the Project Properties, add "Episerver/CMS" to the box next to the "Launch Browser" checkbox, and Save.

Now when you launch the project it will open that URL for you. On first launch the Register Admin User screen will display to create a new user. Once that is complete you can use that Admin user to start poking around... a little.
You will still need to set access rights to use Edit
When you first login with the Admin user you are part of the WebAdmins group. This group does not yet have access rights to the page tree so you need to set Access Rights before you can play around more.
To assign rights to your current user, browse to the Admin tab at the top, and select Access Rights just below that. In the tree that loads, select Root and then click on the Add Users/Groups button.

In the popup that appears, click Groups at the top, select WebAdmins from the list, and click the Add Users/Groups button at the bottom.

Back on the Access Rights screen, check off all the boxes, check off "Apply settings for all subitems" and click the Save Access Rights button.

The Episerver Visual Studio extension for .NET 5
... doesn't seem to do anything. Also, the previously existing step on Optimizely's setup guide to install the Episerver extension is now gone.
That said, it is still a great tool to use in .NET Framework sites, as it provides menu options for creating Episerver items, like Pages, Blocks, and Controllers. In those cases, the classes needed for each were decorated with the proper attributes and some placeholder data to help you out. With .NET 5, however, the Episerver extension didn't provide the same benefit. It doesn't even show in the Add > New Item menu. If you have it installed, leave it. If you haven't installed it yet, you can choose to install or not. As of this time, it's not critical with CMS 12.
For creating new Pages and Blocks, the updated documentation now provides an example of created a StandardPage type here: https://docs.developers.optimizely.com/content-cloud/v12.0.0-content-cloud/docs/creating-a-starter-project#creating-a-page-type. You can also refer to the Content Types documentation for CMS 12 for another good starting point.
I originally had the code below to show a simple PageData class I used to create a Home Page for these tests so I could add a Site Definition.
[pre class="brush:csharp"]
[ContentType(DisplayName = "Home Page", GUID = "{D1CDEDBE-6A72-4928-BAAD-F98942BB2D06}")]
public class HomePage : PageData
{
public virtual string Title { get; set; }
}
[/pre]
Have fun!
P.S. Here's that old bit about the Admin User with CLI tool
Run the Episerver CLI command to create a new Admin user for the CMS.
[pre class="brush:bash; "]
dotnet-episerver
add-admin-user -u AdminUser -p Admin123! -e admin@myco.com -c
EPiServerDB "C:\Work\Projects\Epi Practice\New Epi
Cms12\NewEpiCms12.csproj"
[/pre]
- add-admin-user is the Episerver CLI command to create the admin user. All options specified are required.
- -u [name] specifies the name of the admin user (long form: --username [name]). This value is case sensitive.
- -p [password] specifies the password for the Admin user and must follow the .NET 5 Identity requirements (long form: --password). This value is case sensitive.
- -e [email] specifies the email associated with the Admin account (long form: --email [email]).
- -c EPiServerDB indicates the connection string to use. This will always be EPiServerDB for the CMS setup, and it is case sensitive. (long form: --connectionStringName EPiServerDB).
- The final parameter is the path to the CSPROJ file. If you CD into the newly created directory this value is just the file name. The extension is required.
Article Updates
- This article was originally published on Thursday, October 28, 2021
- This article was edited and republished on Friday, May 13, 2022
Great post Daved. It's nice to have a step-by-step guide. One thing to note is that there are some differences between VS 2019 and 2022 that caused some issues with finding some of the properties. Something to be aware of.
ReplyDelete